
This and that but everything Craft!...
Showing posts with label modpodge. Show all posts
Showing posts with label modpodge. Show all posts
Wednesday, September 26, 2012


Friday, April 20, 2012
Altered/ Modpodge Clipboard
One more thing that was on my creative to do list!
Decorate my clipboard!
Today I took the time to make it!
I choose one of my favorite scrapbook paper and I decided to decorate both side.


Decorate my clipboard!
Today I took the time to make it!
I choose one of my favorite scrapbook paper and I decided to decorate both side.
Here are the supplies needed:

- A Clipboard
- Modpodge
- Foam brush
- Scrapbook paper
- Brayer (optional)
- Paint
- varnish
- Ribbons (optional)
1st Paint the borders of your clipboard


if you want to decorate the back too, then paint it!

If you don't want to varnish your scrapbook paper, I would recommend to varnish your paint at this step.
I cut my paper a little smaller than the clipboard, take some measurement to cut around the hardware,
Then I cut the corners to make them round and
ink all around.

Modpodge your clipboard

Do both sides if you wish.
and glue the paper,
Then if you have a brayer, roll it! or you can do it with a bone folder to take off any bubbles.

You can varnish it if you like
(I applied a layer of sprayed varnish)

(this is the back side!)
and you can also add some ribbons to the hardware
(I like mine like that!)...

Way better than a sad brown clipboard!


I hope you enjoyed!
Shared on:

Featured on:

Tuesday, March 20, 2012
Recycle and decorate!
I was looking for a container to hold my handful of copic markers and I found this empty cacao powder container that I had put aside for an upcoming project!
It's an easy and quick tutorial; Perfect to recycle and re-use container around you!


Shared on:


Feature on:
It's an easy and quick tutorial; Perfect to recycle and re-use container around you!

All you need is:
- A container
- Some paper
- Modpodge
- Paintbrush
- Brayer (optional)
- Scissor
- Tape measure

Once you found you perfect container, measure it to prepare your paper.

I colored some mandalas and thought it would be great on my container.
I found a light paper to coordinate...

Modpodge your container...

and glue your pre-cut paper all around

Apply your brayer to smooth the surface or do it with your fingers.

Now I glue my mandalas on top and ...that's it!
You can protect your container with a transparent adhesive if you wish.


Now I have a beautiful Mandala container to hold my copics and I can choose the color I want to see and change it when I want!!...
Recycle, Re-use and decorate your container for a colorful and pretty decor!...
Shared on:
Feature on:
Friday, March 9, 2012
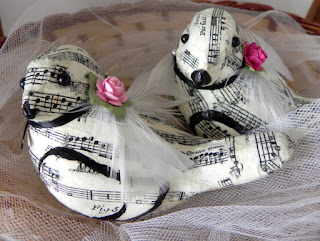
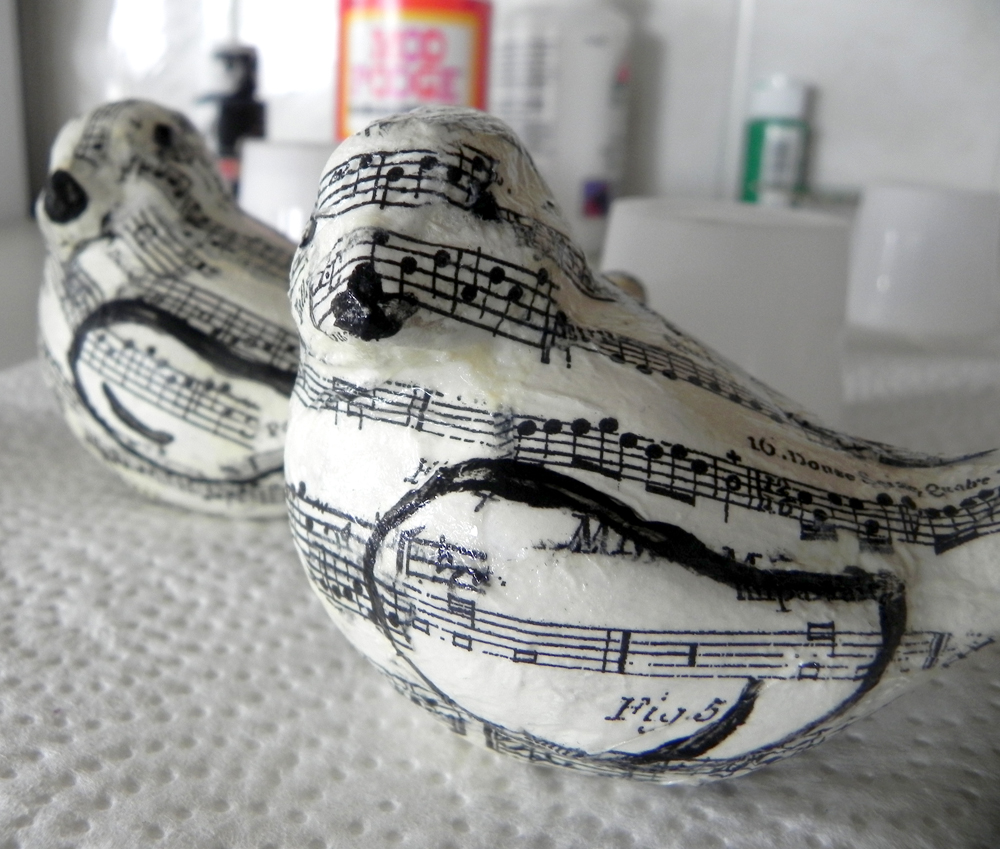
Love Birds
During a visit at Michaels, these little birdies called me!
They are like paper macher (craft paper) bird shape; and there is also butterflies and fruits.
I immediately imagine them with some music scores on them!
I was too impatient to start my project and forgot to take a picture of the supplies!
So, you'll need:
- some paper macher shape
- white and black acrylic paint
- modpodge
- paper napkin with music score or old music sheet
- foam paintbrush
- varnish
- embellishments


While the paint dry, tear some pieces of your paper


Shared on:


They are like paper macher (craft paper) bird shape; and there is also butterflies and fruits.
I immediately imagine them with some music scores on them!
I was too impatient to start my project and forgot to take a picture of the supplies!
So, you'll need:
- some paper macher shape
- white and black acrylic paint
- modpodge
- paper napkin with music score or old music sheet
- foam paintbrush
- varnish
- embellishments
First paint your bird (or other shape) with one or 2 layers of white paint


While the paint dry, tear some pieces of your paper
When the paint is dry, start to glue your pieces on the bird

Cover the whole bird with your paper...

Add a layer of modpodge and let it dry.

When it's dry apply some black paint on the beak and the wing

let it dry

Here is a detail of the painting

Apply one or 2 layers of varnish

Grab some embellishments and have fun!

Here I've added a black ribbon around their neck, a white feather cut in half , a little rose
and some black half pearl on the eyes


and a silver pearl on the ribbon


They will make a lovely decoration for a wedding or a romantic living room!


Hope you've enjoyed!
Shared on:
Subscribe to:
Posts (Atom)